

Mailu is a simple but powerful mail server running on docker containers. It is a free software open to suggestions and contributions. It is meant to provide an easy email server set up. Mailu images should run on any cloud server running Docker (>= 1.11) and you can choose between Docker compose, Kubernetes and Rancher to run your Mailu mail server. In this guide we will help users install and configure Mailu mail server on Ubuntu 20.04 Linux system.
List of VPS Hosting Providers Offering Open Port 25
- Vps Provider With Port 25 Open
- dartnode
- rarecloud
- Contabo.
- Ultahost
- Servebyte.
- OVH.
- Alexhost
- Knownhost
- Racknerd
- Turnkey internet.
- Vpsbg
- Hostwinds
Features of Mailu Mail server
Just like any other mail server, mailu is expected to meet the requirements of sending and receiving emails. The following are some of the most important features of Mailu mail server:
- Standard email server, IMAP and IMAP+, SMTP and Submission
- Advanced email features, aliases, domain aliases, custom routing
- Web access, multiple Webmails and administration interface
- User features, aliases, auto-reply, auto-forward, fetched account
- Admin features, global admins, announcements, per-domain delegation, quotas
- Security, enforced TLS, Letsencrypt!, outgoing DKIM, anti-virus scanner
- Antispam, auto-learn, greylisting, DMARC and SPF
- Freedom, all FOSS components, no tracker included
DNS Setup
You need to create few records for domain to get started. They are as follows.
| Type | Host | Value |
| A | Your IP address | |
| MX | @ | mail.yourdomain.com 10 |
Set up Mailu mail server on Ubuntu 20.04
Update your system packages before installations
sudo apt-get update
sudo apt-get upgrade
We need to ensure that our system has a valid IP address and a fully qualified domain name. There should also be valid mx record for our domain. To set server IP and hostname, run the below commands:
sudo hostnamectl set-hostname mail.example.com
Also add a server’s FQDN and IP address to /etc/hosts file.
sudo vim /etc/hosts
62.15.116.167 mail.example.com
Once set, reboot your system
sudo reboot
The following ports should be allowed through your system firewall as they are critical for emails. You can open the ports with ufw as shown below:
sudo ufw allow proto tcp from any to any port 25,80,443,110,143,465,587,993,995
Install Docker and Docker-Compose
Step 1:- Update System
sudo apt -y update
Step 2: Install basic dependencies
There are few dependencies we need to configure Docker repositories and do the actual package installation. Install them by firing the following commands in your terminal.
sudo apt -y install apt-transport-https ca-certificates curl gnupg-agent software-properties-common
Step 3: Install Docker CE on Ubuntu 22.04|20.04|18.04
Import Docker repository GPG key:
curl -fsSL https://download.docker.com/linux/ubuntu/gpg | sudo apt-key add -
You can then add Docker CE repository to Ubuntu
Ubuntu 22.04:
sudo add-apt-repository "deb [arch=amd64] https://download.docker.com/linux/ubuntu focal stable"Ubuntu 20.04|18.04:
sudo add-apt-repository "deb [arch=amd64] https://download.docker.com/linux/ubuntu $(lsb_release -cs) stable"Finally install Docker CE on Ubuntu22.04|20.04|18.04:
sudo apt update
sudo apt install docker-ce docker-ce-cli containerd.io
Add your user account to docker group.
sudo usermod -aG docker $USER
newgrp docker
Verify installation by checking Docker version:
$ docker version
Client: Docker Engine - Community
 Version:           20.10.12
 API version:       1.41
 Go version:        go1.16.12
 Git commit:        e91ed57
 Built:             Mon Dec 13 11:45:33 2021
 OS/Arch:           linux/amd64
 Context:           default
 Experimental:      true

Server: Docker Engine - Community
 Engine:
  Version:          20.10.12
  API version:      1.41 (minimum version 1.12)
  Go version:       go1.16.12
  Git commit:       459d0df
  Built:            Mon Dec 13 11:43:42 2021
  OS/Arch:          linux/amd64
  Experimental:     false
 containerd:
  Version:          1.4.12
  GitCommit:        7b11cfaabd73bb80907dd23182b9347b4245eb5d
 runc:
  Version:          1.0.2
  GitCommit:        v1.0.2-0-g52b36a2
 docker-init:
  Version:          0.19.0
  GitCommit:        de40ad0
Install Docker-Compose
sudo apt update
sudo apt install -y curl
download the latest Compose on your Linux machine
curl -s https://api.github.com/repos/docker/compose/releases/latest | grep browser_download_url | grep docker-compose-linux-x86_64 | cut -d '"' -f 4 | wget -qi -
Make the binary file executable.
chmod +x docker-compose-linux-x86_64
Move the file to your PATH.
sudo mv docker-compose-linux-x86_64 /usr/local/bin/docker-compose
Add user to docker group:
sudo usermod -aG docker $USER
newgrp docker
Configure Compose Command-line completion
sudo curl -L https://raw.githubusercontent.com/docker/compose/master/contrib/completion/bash/docker-compose -o /etc/bash_completion.d/docker-compose


source /etc/bash_completion.d/docker-compose

curl -L https://raw.githubusercontent.com/docker/compose/master/contrib/completion/zsh/_docker-compose > ~/.zsh/completion/_docker-compose

fpath=(~/.zsh/completion $fpath)

autoload -Uz compinit && compinit -i

exec $SHELL -l
Test Docker Compose installation
vim docker-compose.ymlAdd below data to the file.
version: '3'
services:
  web:
    image: nginx:latest
    ports:
     - "8080:80"
    links:
     - php
  php:
    image: php:7-fpm
docker-compose up -d
docker-compose ps
docker-compose stop
docker-compose rm -fInstall Mailu
Now, docker and docker-compose installed, it’s time to install Mailu.
Mailu has made it super easy to generate bin file that you will need to install mail server. Simply go to following link and fill the details as follows.
- https://setup.mailu.io/
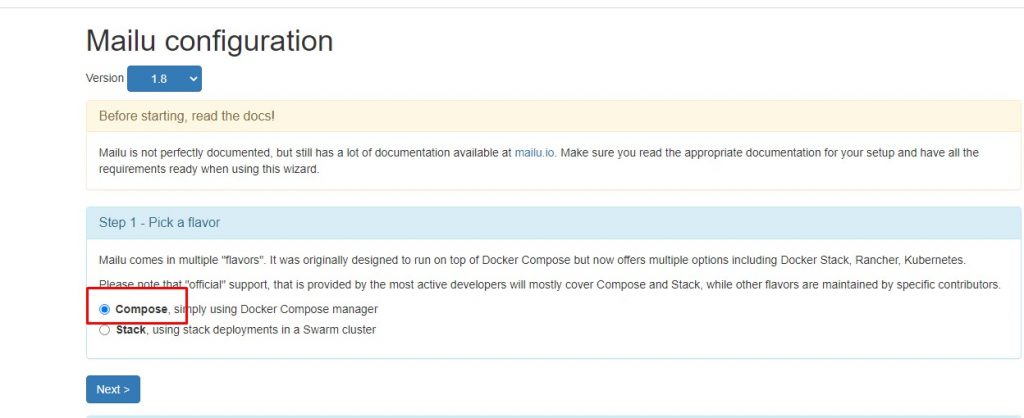
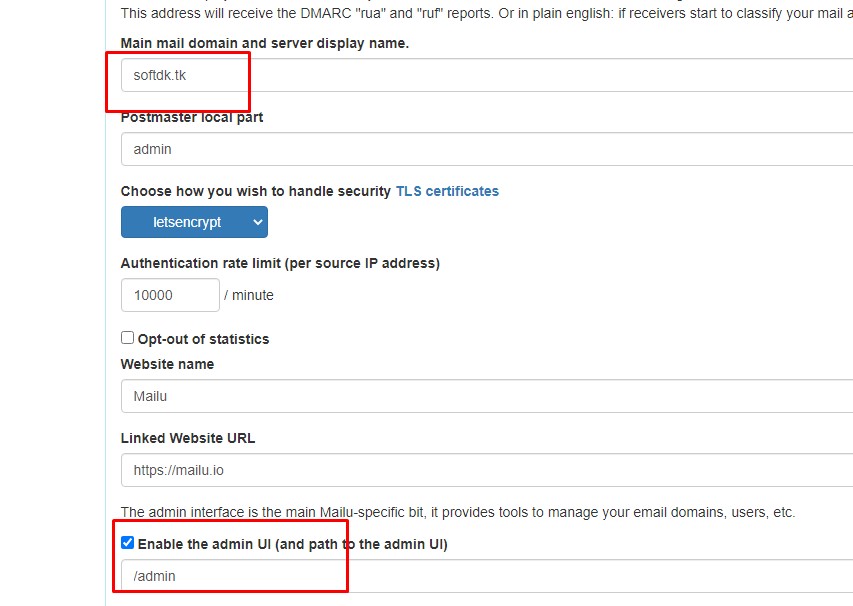
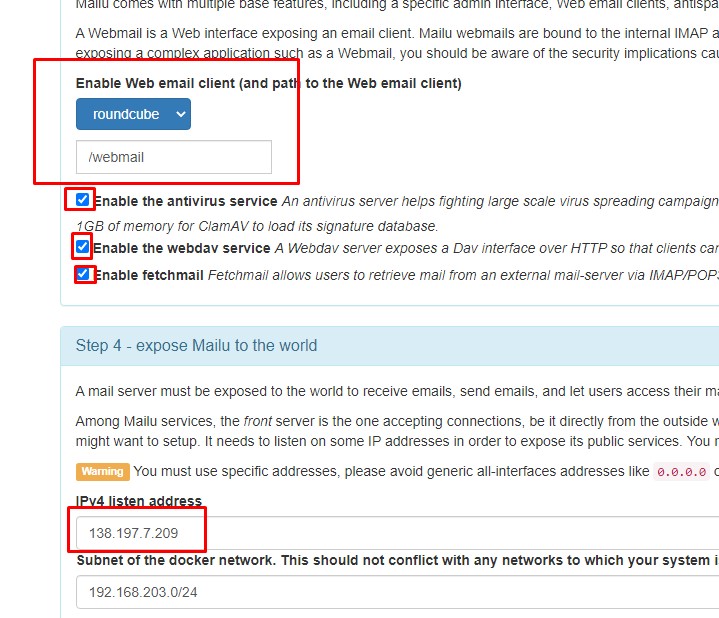
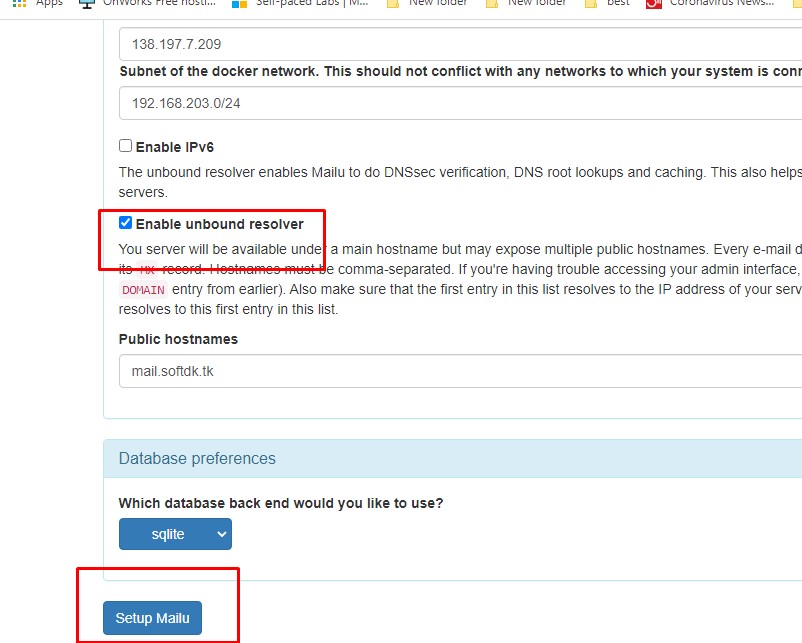
On next screen, fill in the blanks circled in red to generate the configuration file
After that, you will be given with set of commands to run, which will install Mailu mailserver.
Now, let’s execute commands from above screenshot, but with some additional steps.
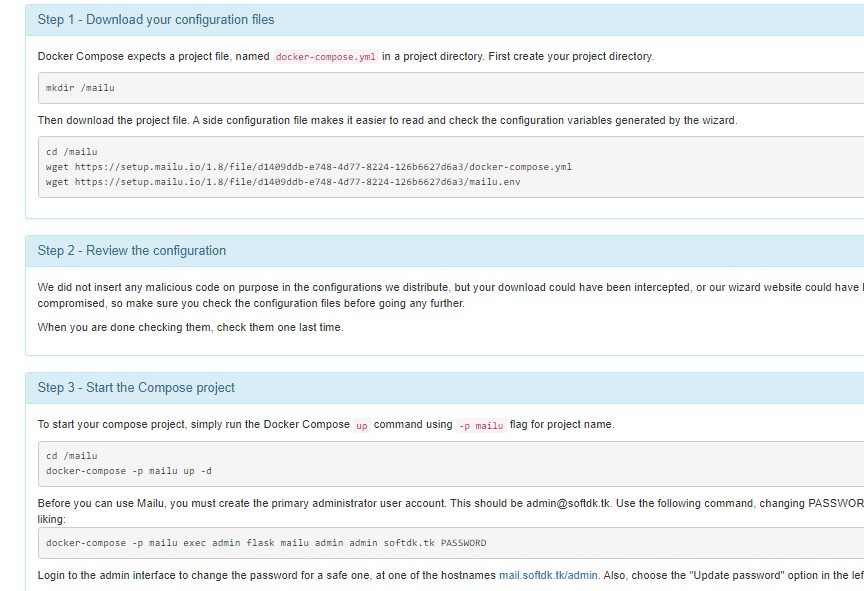
First command is to make directory.
mkdir /mailucd /mailu
wget http://setup.mailu.io/1.7/file/f9c808a6-ec48-4499-b4da-346deb0480f3/docker-compose.yml
wget http://setup.mailu.io/1.7/file/f9c808a6-ec48-4499-b4da-346deb0480f3/mailu.envThen, review the configuration files docker-compose.yml and mailu.env file.
apt install pwgen
pwgen 16
Start the Compose project
export MAILU_VERSION=1.9
docker-compose -p mailu up -d
Set admin user by running the below command:
docker-compose -p mailu exec admin flask mailu admin admin example.com PASSWORD
created admin user
Configure Mailu Mail Server on Ubuntu 20.04
Once done, access Mailu web portal using your hostname: https://mail.yourdomain.com/admin You should get a page to login with you administrator password. Once you login, you should see a page as below. Ensure to update your password to a stronger one by clicking on ‘update password‘.
Login with username [email protected] and PASSWORD
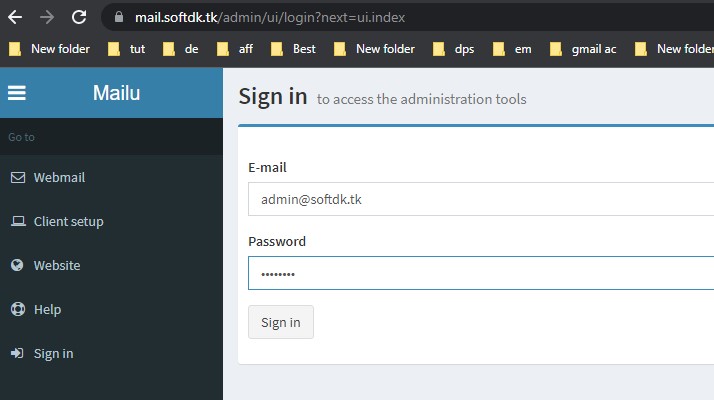
On next, screen change the admin password. Further, you can explore yourself.
Final DNS Setup
To wrap up Mailu Docker installation, you need to create 3 TXT DNS records.
Generate DKIM & DMARC Keys
To generate DKIM & DMARC keys go to Mail Domains and then Details of domain as shown below.

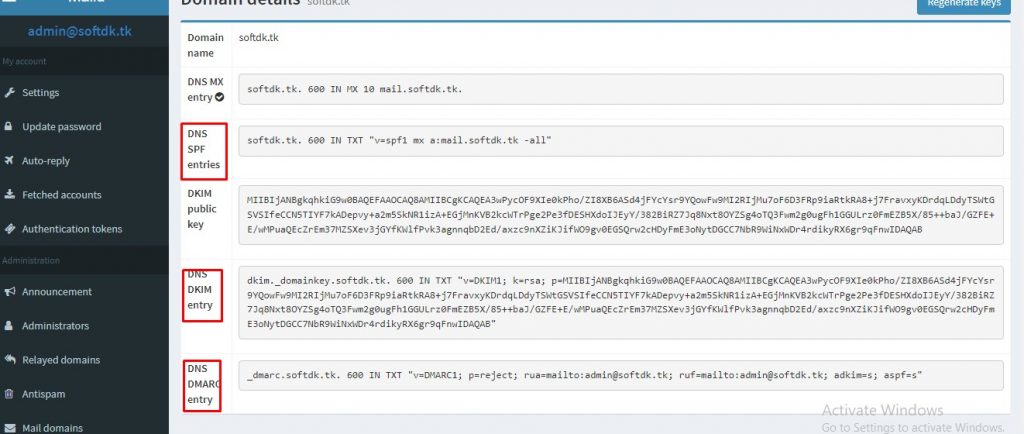
Now, you have all 3 records viz, DKIM, DMARC and SPF. Go to your domain registrar and make these entries.