Introduction Installing and configuring PowerMTA is a straightforward process on the most stable and reliably performing operating system, Debian. This guide will walk you through the step-by-step process involved in installing and configuring PowerMTA on a Debian OS, with the end goal of allowing you to have an efficient and reliable email server.
PowerMTA Overview PowerMTA is high-performance MTA software purposely built for handling large email deliveries. Features include IP rotation, bounce handling, and feedback loops that give it a leading preference for businesses that require strong email infrastructure.
Features
- High throughput and reliability
- Advanced IP management and rotation
- Detailed delivery reports and logs
- Easy integration with the email marketing platforms
Benefits
- Improved email deliverability
- Enhanced reputation management
- Efficient handling of bounces and complaints
- Scalability for growing email needs
Requirement for PowerMTA
- VPS or cloud or dedicated server with at least 2GB of RAM (recommended minimum 8GB).
- A domain name. Namecheap, Godaddy.
- PowerMTA rpm file and license. You can get it from Sparkpost.
- List of VPS Hosting Providers Offering Open Port 25
Licensing PowerMTA is a commercial product requiring a license. It offers different licensing options based on the volume of emails and exact requirements of the user.
Prepare Your Debian System Before you install PowerMTA, ensure that your Debian system is updated and has all the dependencies which the software requires.
Update the System
sudo apt-get update
sudo apt-get upgrade
Installing Dependencies PowerMTA needs several dependencies, for instance, libc6, libssl-dev, and so on.
sudo apt-get install libc6 libssl-devDownloading PowerMTA PowerMTA can be directly downloaded from the vendor. Make sure you get the version that is compatible with your architecture of Debian.
Get the Software Go to the vendor's page, login into your account, and download the latest version of PowerMTA for Debian.
Verifying the Download Checksums offered by the vendor can be used to verify the integrity of the download, ensuring the file hasn't been tampered with.
Installing PowerMTA on Debian
Upload PowerMTA installation files .deb on your Debian server root folder. then run this command
sudo dpkg -i PowerMTA-5.0r8.deb#PowerMTA-5.0r8.deb this is file name. if your file name different then use that name.
PowerMTA Installed Successfully. Now You Need Configure Some File.
Then Copy your license file to /etc/pmta/ and you are done!
Configuring PowerMTA
With PowerMTA installed, proper configuration is key to harnessing its full potential. Learn how to navigate the basic settings, edit the configuration file, and set up essential features like virtual MTAs and IP rotation for optimal performance and deliverability.
Config file located in /etc/pmta/ directory just open it so we edit and configure.
You will find a place where you can change the IP address And Also Find a Place Where You Can Change Your domain Name.
Now restart PowerMTA service using the following command:
service pmta restartUsing the pmtad --debug command can help you troubleshoot issues with PowerMTA by providing detailed debug information. Here's how you can use this command effectively:
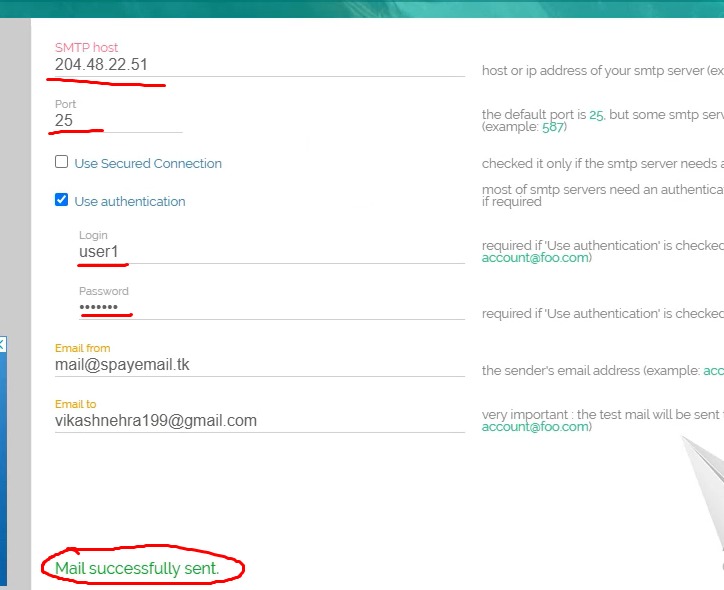
pmtad --debug4. Send a Test Email:-
Hostname: Your Ip Server Ip Address/domain Name
Username: Your in config file
Password: Your password XXXXX from the section in config file
Port: 25
Go to SMTPER.NET and enter your server details as follows:

installation and configuration PowerMTA Completed.
Configure SPF, DKIM and DMARC:-
Dkim (DomainKeys Identified Mail) :–
Run the following commands:
1: openssl genrsa -out dkim.private.key 1024
2: openssl rsa -in dkim.private.key -out dkim.public.key -pubout -outform PEM
Now Open Dkim.public.key File and copy dkim code.
Dkim Format
"v=DKIM1; k=rsa; p=Your Dkim Code"Now Open your DNS zone in and add the following record
SPF (Sender Policy Framework):–
To set up SPF. Open your DNS zone in and add the following record:
v=spf1 a ip4:XXX.XXX.XXX.XXX ~allXXX.XXX.XXX.XXX = Replace with your server IP.
DMARC (Domain-based Message Authentication, Reporting & Conformance):–
Open your DNS zone in and add the following record
v=DMARC1; p=none; fo=1; rua=mailto:[email protected]; ruf=mailto:[email protected]Integrating PowerMTA with Email Applications
Seamless integration of PowerMTA with your email applications is vital for effective email delivery. This section provides insights into configuring connection settings for various email applications and testing the integration to ensure reliable email dispatch.
Configuring the Installer At the time of installation, you will be asked to set up some basic configuration settings. Follow the on-screen installation steps and your installation will be completed soon.
Basic Configuration of PowerMTA Like any other software, after installation PowerMTA also needs some configuration so that it can work according to your requirements.
Configuration File Editing The path of the basic configuration file is /etc/pmta/config, and from there you can set the IP addresses and domain names, etc.
Configuring IP Addresses Define the IP addresses that PowerMTA will use for sending emails. It ensures the concept of IP rotation and deliverability.
Configuring Virtual MTA Pools Virtual MTA pools allow you to group sets of IP addresses for individual specific tasks which enable you to optimize delivery and ease of management.
Advanced Configuration Options Many advanced configuration options are available in PowerMTA to fine-tune your email delivery system.
IP Rotation Implement an IP rotation process that spreads email traffic across many IP addresses to improve deliverability and reduce the probability of being blacklisted.
Feedback Loops Implement feedback loops for automatic handling of complaints and bounces, thus maintaining a clean sending reputation.
DKIM/DMARC Set up DKIM and DMARC for your emails to be authenticated at a higher level of trust and, hence, to deliver more.
Set Up Monitoring and Logging You need to do proper monitoring and logging to keep the PowerMTA installation healthy.
Log File Configuration Configure PowerMTA to produce log files with detailed log entries for troubleshooting and performance analysis purposes. These logs are normally placed in.
/var/log/pmtaSet Up Alerts Set up email or SMS alerts to notify you of critical issues or performance anomalies in real-time. Use monitoring tools, such as Nagios or Zabbix, to keep tabs on the PowerMTA instance and make sure things are running fine.
Securing Your PowerMTA Installation Security remains a top concern when using an MTA. Use the following to secure your PowerMTA installation:
Firewall Setup Configure a firewall so that access to PowerMTA services is restricted to trusted IP addresses only.
sudo ufw allow from <trusted_ip> to any port 25,587,2525Securing Ports Make sure only ports that are in use and necessary are accessible and open.
Setting Up SSL Use SSL/TLS so that your email server can communicate with its clients in an encrypted way. It will be safe and secured while transferring sensitive information.
Performance Tuning for PowerMTA Optimize the performance of PowerMTA with the necessary key settings and efficient resource management.
Optimizing Throughput Enhance and adjust the throughput by modifying concurrency settings and through hardware optimization of the server.
Concurrency Settings Adjust the concurrency settings to attain a balance in the load for maximizing email dispatch speed without overloading the server.
Resource Management Monitor and manage the use of system resources to keep away from operation bottlenecks.
Your PowerMTA Setup Test Before going live, do tremendous testing with your PowerMTA setup to ensure all things are properly working.
Sending Test Emails Now send test emails to confirm that PowerMTA is sending messages correctly. Check logs and check the feedback on test emails to verify that delivery is taking place, otherwise troubleshoot.
Troubleshooting Common Issues The logs and documentation of PowerMTA contain essential information in figuring out the common issues of installation and configuration.
Integrate PowerMTA with Other Tools There are also a few tools with which you can integrate PowerMTA and, therefore, increase its overall scope, which will streamline your workflow of emailing.
SMTP Relays These route through other MTAs or third-party services.
Email Marketing Tools For integration with the most popular email marketing tools, so you can send campaigns and track results.
CRM Integration Integrate PowerMTA with your CRM system, further automating email communication to maximize customer engagement.
Maintain Your PowerMTA Installation Regular maintenance can be the difference between a well-oiled machine and potential chaos in the software environment of PowerMTA.
Regularly Updated Keep the PowerMTA and all its dependencies updated to incorporate new features and security patches.
Backup Strategies Implement a strong backup strategy in order to safeguard both your configuration and data.
Dealing with Common Errors Proactively deal with common errors and issues by referring to the provided documentation and community resources of the PowerMTA community.
Common Issues and Solutions Most of the issues are quite common and can be dealt with when working with PowerMTA.
Error Codes Know what common error codes mean so that you can quickly diagnose problems.
Troubleshooting Steps Learn troubleshooting steps for effective issue resolution.
Community Resources Use community resources, forums, and user groups as another avenue for other support resources and ideas.
Best Practices for PowerMTA Implement best practices to maximize performance and deliverability with your PowerMTA installation.
Email Deliverability Tips Maintain Your Lists in Compliance with Best Practices: The best way to avoid sending triggers that may be flagged as spam by ISPs.
ISP Compliance Guidelines Maintain good sending practices and policies to prevent blacklisting by the largest number of receivers.
Reputation Management Proactively manage your sending reputation. Monitor feedback; address issues.
PowerMTA Licensing Understand the licensing of PowerMTA and associated costs so you can make informed decisions.
Licensing Options Consider and decide with the various licensing options that best suit your needs and budget.
Cost Analysis Compare the cost of running PowerMTA across licensing, hardware, and maintenance.
Vendor Support Availability Check what support is available for the vendor regarding response time and resource availability.
Alternatives to PowerMTA There are alternatives to PowerMTA that you might find better suited to your needs. Compare PowerMTA with other popular MTAs like Postfix, Exim, and Sendmail to understand their strengths and weaknesses. Evaluate alternative MTAs—pros and cons In relation to this, pros and cons of other alternative MTA should be considered in establishing which best fits your requirements.
Popular Alternatives
- What is PowerMTA? PowerMTA is a High-Performance Mail Transfer Agent software.
- Is PowerMTA Free? No, PowerMTA requires a commercial license based on your email volume and specific requirements.
- How would I download PowerMTA? You would be able to download PowerMTA once you purchase a license through the official vendor's website.
- What are the system requirements for PowerMTA? PowerMTA requires a Debian system with the capability of handling your email volume, having all necessary dependencies like libc6 and libssl-dev.
- Is PowerMTA Compatible with my current email marketing tools? Yes, PowerMTA works just with a plethora of other email marketing tools and CRMs.
- How to Troubleshoot Installation Related Issues in PowerMTA? Just check the installation logs of PowerMTA, related documentation and community forums for solutions to any kind of issues that you may come across during the installation process.

