


WHMCS is a set of online trading software that integrates customer management, financial and help systems. Hosts can easily implement customer information management, help system management, customer order management, customer hosting and domain name management in WHMCS. WHMCS supports the most popular hosting control panels such as cPanel and Plesk
As an application based on PHP & MySQL, the installation of WHMCS is relatively simple. It can be divided into three stages: before installation, during installation and after installation. For details, please refer to the following steps.
Development language: PHP
Installation environment: PHP+MySQL
License agreement: commercial license, need to pay to use
Official address: http://www.whmcs.com/.
The advantages of WHMCS are as follows
. Supports automatic sending of bills for hosts, domain names and other products, and renewal reminder bills
. Support for creating a one-time bill
. Support flexible customization of product pages and product email templates
. Integrated help system, which greatly facilitates customer service
. Support group emails to all customers in the account
. Support automatic creation or deletion of host accounts, domain accounts, etc.
. Powerful account statistics function, detailed financial statements
. Support simple, practical and customizable customer panel
. The search function in the site is simple and easy to use
. Log statistics function is convenient and practical
. Strong API interface integration
Preparation before installation
- Download WHMCS
(1) Visit WHMCS official website, https://download.whmcs.com/
(2) Click the download button under the title of Full Release-this will be the latest official version
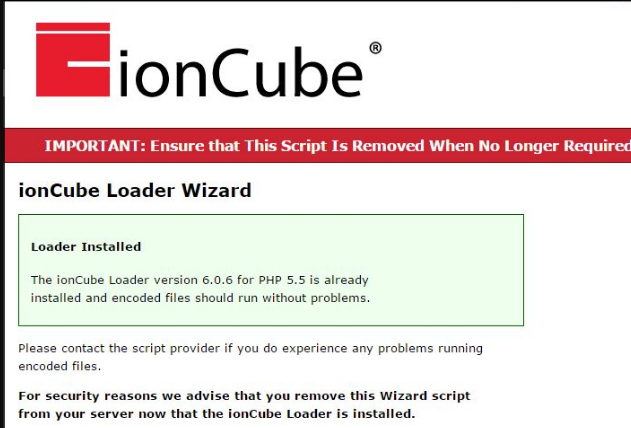
- Install Ioncube
In order to protect the source code, WHMCS is encrypted using Ioncube. Currently, most servers/virtual hosts support Ioncube compiled into PHP by default, so generally speaking, you don't need to take other actions. However, if you do need to install Ioncube on your server, then you can refer to https://docs.whmcs.com/Ioncube_Installation_Tutorial for specific steps.
To install ioncube
visit http://www.ioncube.com/loaders.php,
download the appropriate version and install it (under windows, pay attention to whether it is the Non-TS version, whether it is 32-bit or 64-bit, it should be consistent with your php version), And do the configuration in php .ini according to the installation directory, such as:
zend_extension=/usr/lib/php5/20121212/ioncube_loader_lin_5.5. so(The 5.5 here corresponds to the php version 5.5; under Linux it is a .so file, and under windows it should be a .dll file). After completion , you can visit on the browser loader-wizard.php to verify whether the installation is successful

- Create a database
WHMCS uses MySQL to store all settings and data. During the installation process, you will be asked to create a database, so you'd better create one in advance.
- Configure the database permissions required for WHMCS installation
For daily use, only the following database privileges are necessary. All other databases may be disabled.
DELETE
INSERT
SELECT
UPDATE
LOCK TABLES
Note, however, WHMCS in installation , update , activate and disable the module requires the following additional privileges.
ALTER
CREATE
DROP
INDEX

Whmcs installing
Installing WHMCS is very simple. The following steps can guide you through the installation process:
Unzip the contents of the compressed installation file to your local folder;
Change the name of configuration.php.new to configuration.php;
Upload the entire WHMCS folder to your website directory-if you have any problems, try uploading in binary mode;
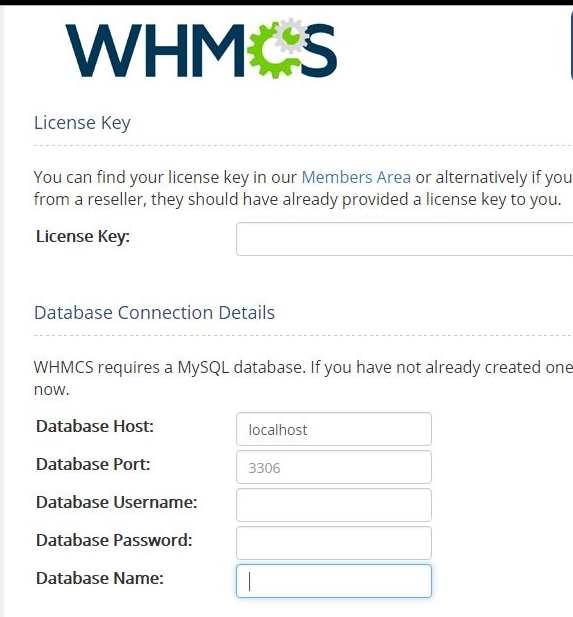
Now visit the installation script http://www.yourdomain.com/install/install.php to run the installation process-if you get an error message related to Ioncube, please refer to the Ioncube installation steps above;
Follow the instructions on the screen, including setting the file permissions listed below, entering your license key, and creating your master management account.
visit http://your_domain/whmcs/admin visits the administrator page of whmcs. If you don't want to see the whmcs in the link, you can change the directory pointed to by your_domain, or copy all the files in the whmcs folder to the root directory of the website before installation
Set directory and file permissions
The above permissions are only applicable when your php is running in suPHP or PHPSuExec mode. If you use DSO as your php processor, you must use 644 permissions.
/configuration.php CHMOD 400 is readable
/attachments CHMOD 777 writable
/downloads CHMOD 777 writable
/templates_c CHMOD 777 writable
After completing the above steps, delete the installation folder in your web server and change the permissions of the configuration.php file back to 644.
Recommended steps after installation
After completing the installation, we recommend that you follow the steps below to complete and configure your new WHMCS system:
Perform recommended further security steps (Further Security Steps)
Log in to the management area and configure your general settings (Setup> General Settings)
Set up your payment gateway (Setup >Payment Gateways)
Set up your products and services (Setup >Products and Services)
Configure your domain pricing (Setup >Domain Pricing)
Set up your ticket support department (Setup >Support Departments)
Set up the email pipeline system, so you can use the WHMCS support desktop to manage work orders-for detailed instructions, please check the email pipeline system (https://docs.whmcs.com/Email_Piping) article.
Ensure that WHMCS scheduled tasks are set, and automatic tasks are configured (Setup >Automation Settings)
Submit a few test orders on your website to see if everything is working as expected.
For further guidance, you can watch the WHMCS video tutorial www.whmcs.com/get-support/video-tutorials/