


1. What is Postal Mail Server ?
2.How To Install Postal Mail Server ?
What is Postal all about?
Postal was developed by aTech Media to serve its own mail processing requirements. It includes everything you need to start sending and receiving emails in your own web apps.
-Send email from your sites and servers
-Run on your own hardware
-Easy to set up with comprehensive docs
-Spam and virus checking
-Message Retention
-IP pools

How To Install Postal Mail Server on Ubuntu
- Domain
- Vps Server
- Software Need
- Install Process
1. Domain
When you send emails, you will be sending from an email address like this one:
i recommend to buy high reputation domain.
We have a lot of DOMAIN REGISTRATION PROVIDERS where you can get a domain from like:
Godaddy.
Namecheap.
freenom.
Enom.
Google Domain.
2. Vps Server
The second thing you will need is a VPS server. a public server to install & Setup SMTP.
In My Post i Am Using Digitalocean Vps Server.
Here is a list of some companies:
List of VPS Hosting Providers Offering Open Port 25
- Vps Provider With Port 25 Open
- dartnode
- rarecloud
- Contabo.
- Ultahost
- Servebyte.
- OVH.
- Alexhost
- Knownhost
- Racknerd
- Turnkey internet.
- Vpsbg
- Hostwinds
3. Software Need
-Putty
PuTTY is a free and open-source terminal emulator, serial console and network file transfer application.
-Winscp
WinSCP is a free and open-source SFTP, FTP, WebDAV, Amazon S3 and SCP client for Microsoft Windows.
-Notepad++
Notepad++ is a text and source code editor for use with Microsoft Windows.
4. Install Process
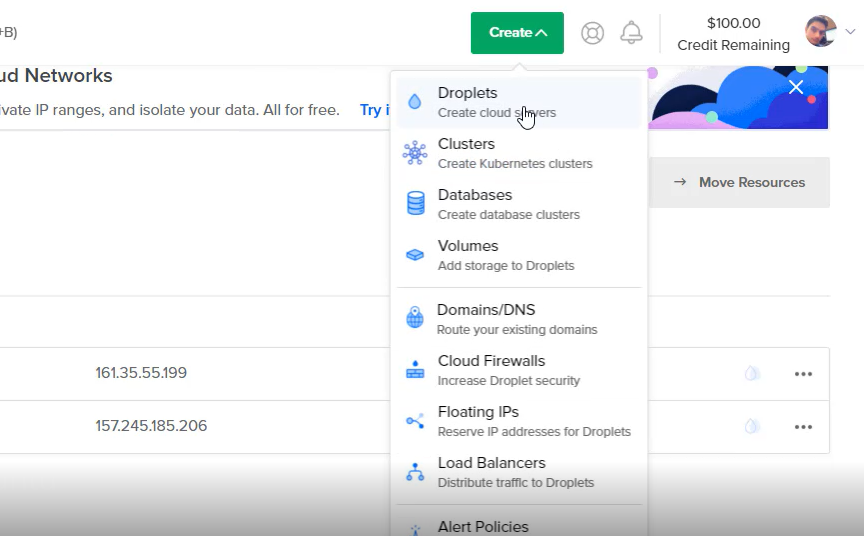
:-First Create a Vps Server.
- Go to Digitalocean And Create A Droplet

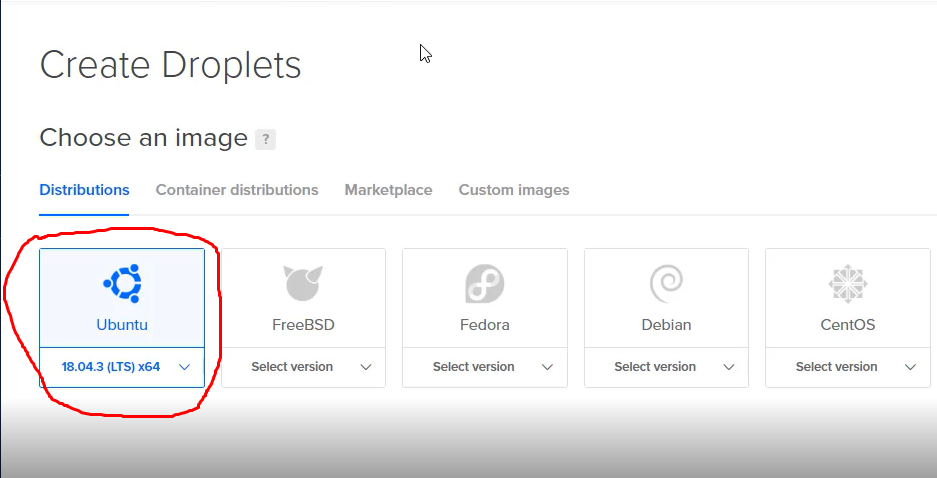
2. Choose an image

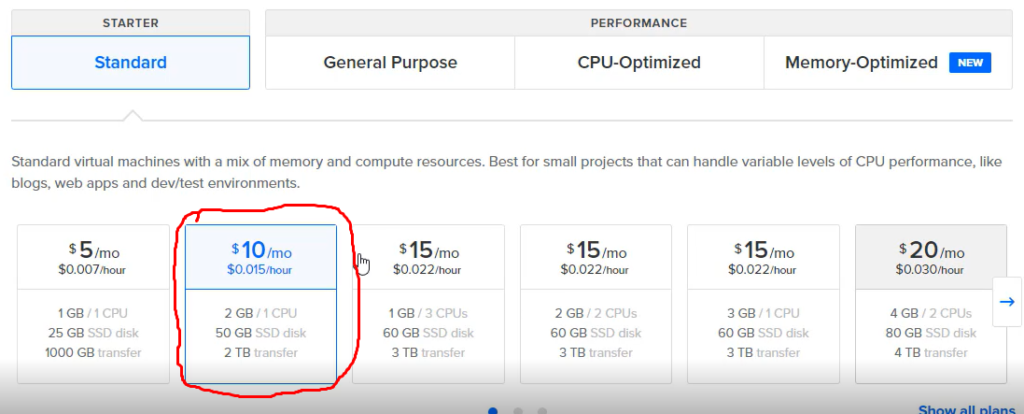
3.Choose a plan (i am using $10 machine)

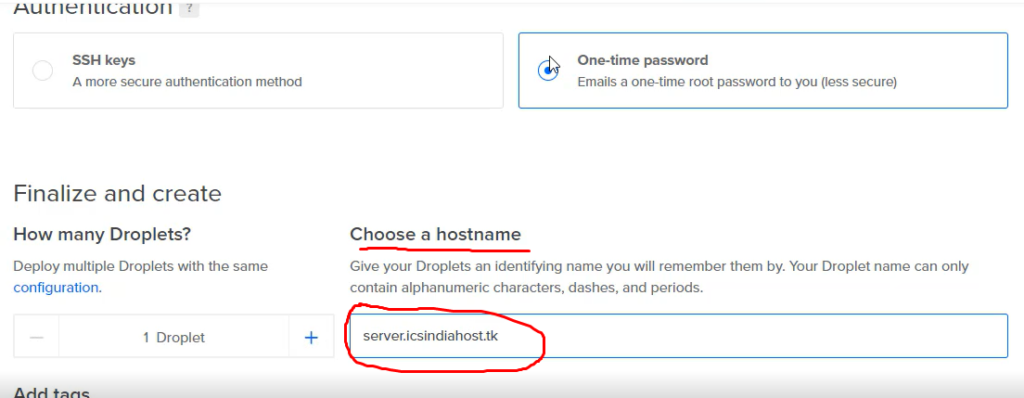
4.Choose a hostname
In Hostname Put Your Domain Name. i am Using Server.icsindiahost.tk. server is sub domain. Server.yourdomain.com

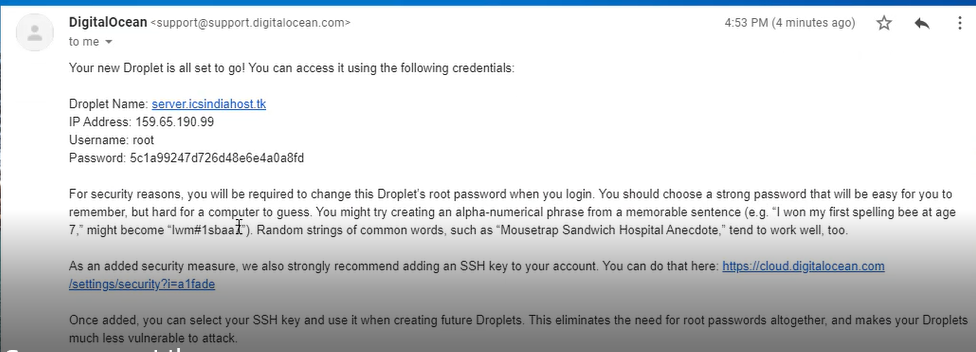
5.Now Click Create droplet. Few Minutes After You Receive a Email.

:-Install Postal Mail Server Using Putty
- First Open Putty Software And Put Your Server Ip Address.

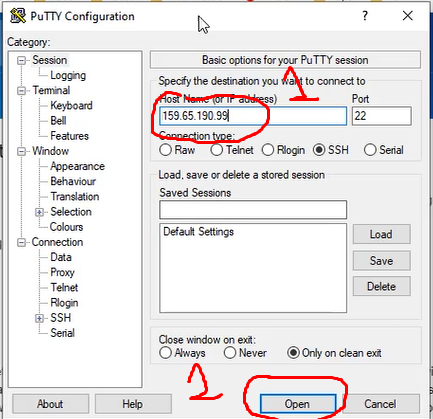
2. Now Login as Root User And Create New Password. You Not Understand Then Watch My YouTube Video.


3. Now Run This Simple Command line.
hostname -f

sudo hostname xyz.com
-------xx-------------
-sudo apt-get update
-sudo apt-get install \
    apt-transport-https \
    ca-certificates \
    curl \
    gnupg \
    lsb-release
-curl -fsSL https://download.docker.com/linux/ubuntu/gpg | sudo gpg --dearmor -o /usr/share/keyrings/docker-archive-keyring.gpg
-echo \
  "deb [arch=amd64 signed-by=/usr/share/keyrings/docker-archive-keyring.gpg] https://download.docker.com/linux/ubuntu \
  $(lsb_release -cs) stable" | sudo tee /etc/apt/sources.list.d/docker.list > /dev/null
-sudo apt-get update
-sudo apt-get install docker-ce docker-ce-cli containerd.io
-sudo curl -L "https://github.com/docker/compose/releases/download/1.29.2/docker-compose-$(uname -s)-$(uname -m)" -o /usr/local/bin/docker-compose
-sudo chmod +x /usr/local/bin/docker-compose
-docker-compose --version

-------xx-------------
-------xx-------------System utilties--------------------------
apt install git curl jq
-------xx-------------
-----------------------Git & installation helper repository
--------------------
-git clone https://postalserver.io/start/install /opt/postal/install
-sudo ln -s /opt/postal/install/bin/postal /usr/bin/postal

---------------------Maria DB
--------------------------------
docker run -d \
   --name postal-mariadb \
   -p 127.0.0.1:3306:3306 \
   --restart always \
   -e MARIADB_DATABASE=postal \
   -e MARIADB_ROOT_PASSWORD=postal \
   mariadb

-------------------RabbitMQ--------------
docker run -d \
   --name postal-rabbitmq \
   -p 127.0.0.1:5672:5672 \
   --restart always \
   -e RABBITMQ_DEFAULT_USER=postal \
   -e RABBITMQ_DEFAULT_PASS=postal \
   -e RABBITMQ_DEFAULT_VHOST=postal \
   rabbitmq:3.8


--------------------Initializing the database-----------------
postal initialize
postal make-user

postal start


-------------------Installing WEB Client-----------------------
docker run -d \
   --name postal-caddy \
   --restart always \
   --network host \
   -v /opt/postal/config/Caddyfile:/etc/caddy/Caddyfile \
   -v /opt/postal/caddy-data:/data \
   caddy
5. And this command will ask you to Enter Your Name, Email, and password. so write it down and press Enter.
Postal is Installed
:-Configure Postal SMTP
- Run Ip Address On Web Browser. After Skip The Ssl Alert Message

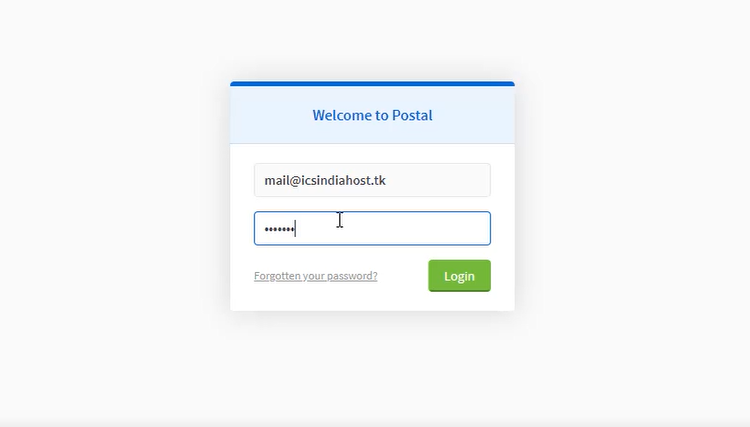
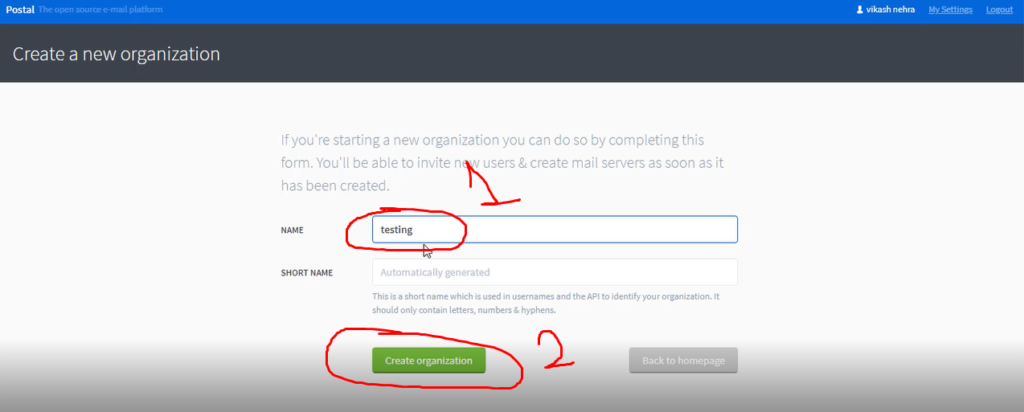
2.Now Put Your Username And Password Then Click Login . After Login Create the first organization. Put Any And Click Create organization.

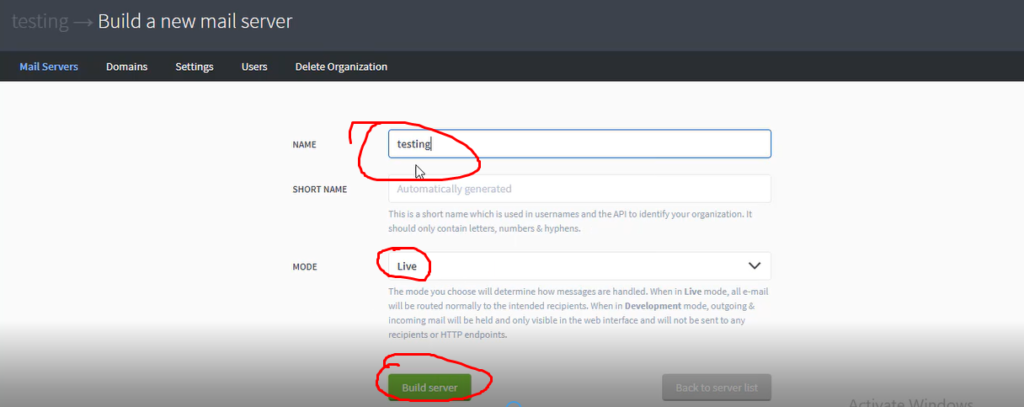
3. Now Build Your First Mail Server. Put Any Name And Select Mode Live Then Click Build Server.

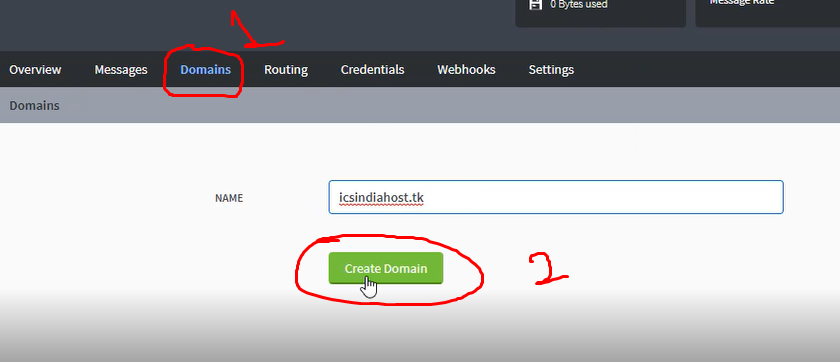
4. Now Add Your Domain Name.

5. Then, Postal will show you the Domain page with the records that you need to configure.

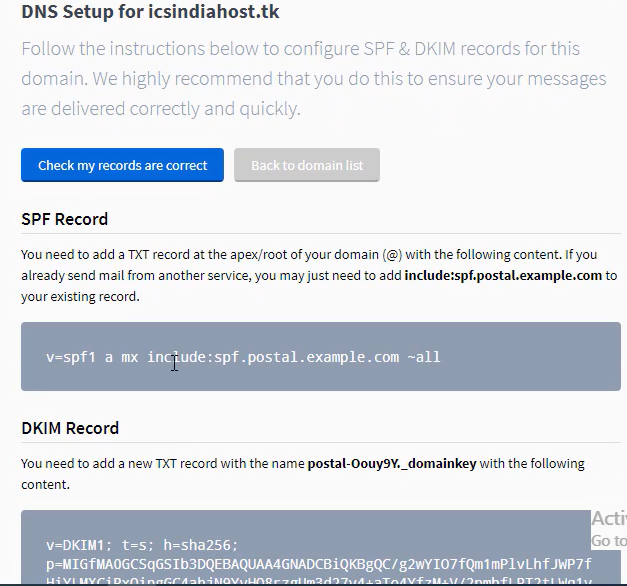
6. You Not Know How To configure SPF And Dkim records Then Watch My Youtube Video.
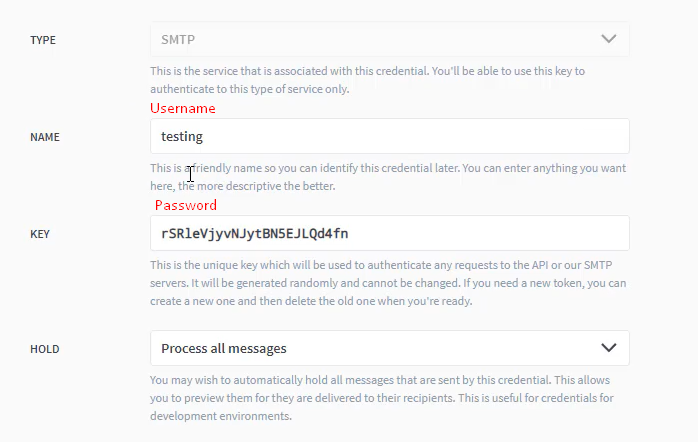
7. Now Click Credentials And Create Smtp. You Need API Then Select TYPE API.


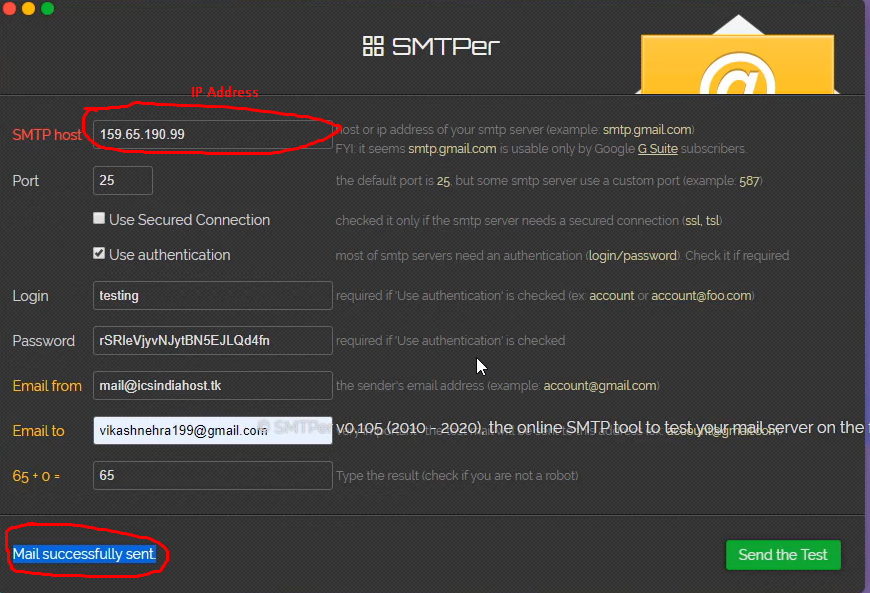
8. Simple, Go to SMTPER.NET and enter your server details as follows:[Test Email]
- SMTP Host: Your Server IP or Domain.
- Port: 25 or 2525
- Login: The User You entered in credentials.
- Password: The User Password.


That’s it! I hope everything was simple and clear. we finish setting up the Free SMTP Server!